Baking sourdough bread is a delightful and rewarding experience, but not everyone has a Dutch oven at their disposal. If you’re wondering how to bake sourdough without a Dutch oven, you’re in the right place. Whether you’re a seasoned baker or a beginner, this guide will walk you through alternative methods to achieve that perfect, crusty loaf. From using different types of bakeware to mastering steam techniques, you’ll discover that a Dutch oven isn’t the only way to bake delicious sourdough. Let’s dive in and explore the possibilities!
Understanding Sourdough Baking
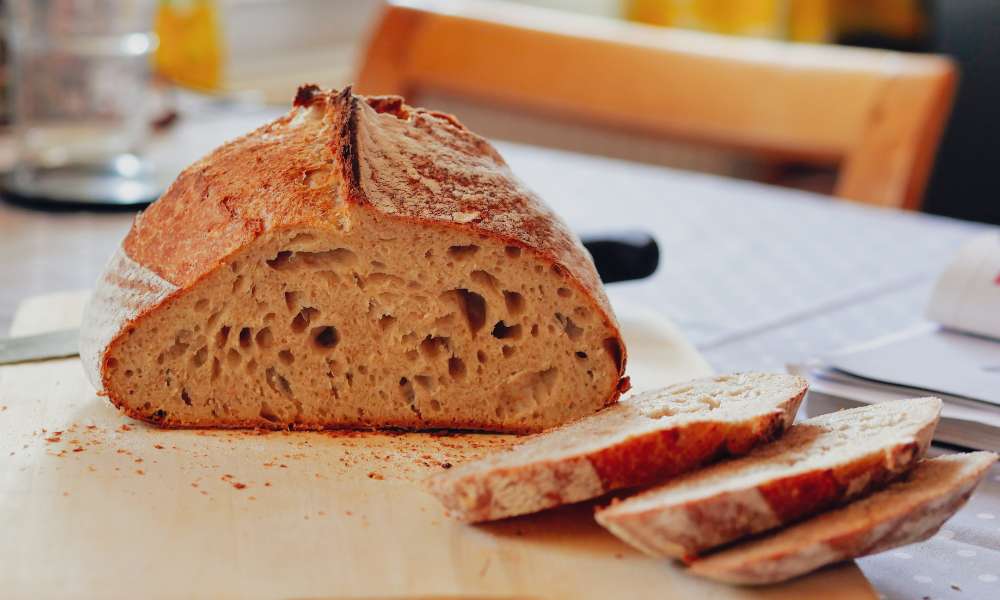
Sourdough bread is particular because of its reliance on natural fermentation, which entails a symbiotic tradition of wild yeast and lactic acid micro organism. This herbal leavening procedure no longer only imparts a wonderful tangy flavor but also contributes to the bread’s chewy texture and crispy crust. Unlike bread made with commercial yeast, sourdough calls for cautious attention to detail and patience for the duration of the coaching and baking technique.
Proper techniques, along with particular measurements, controlled fermentation times, and accurate baking temperatures, are vital to achieving the desired effects. Mastering these strategies ensures that the bread develops its characteristic open crumb shape, wealthy taste profile, and exquisite crust, making the effort well really worth the reward.
Essential Tools and Ingredients
- Mixing Bowl
- Kitchen Scale
- Baking Sheet
- Parchment Paper
- Flour, Water
- Salt
- Sourdough Starter
Preparation Steps
The journey to best sourdough starts offevolved with activating and preserving a healthful sourdough starter. This entails feeding the starter often with equal elements of flour and water, ensuring it turns into bubbly and energetic. Once the starter is prepared, mixing and kneading the dough are the following vital steps. Combine flour, water, salt, and the lively starter, blending till a difficult dough forms.
Kneading allows broaden the gluten shape, that’s vital for the dough’s elasticity and strength. After kneading, the dough undergoes preliminary fermentation, regularly called the bulk fermentation stage. During this era, the dough rests and rises, permitting the herbal yeast and micro organism to paintings their magic. Proper dough handling, including stretching and folding techniques, can in addition beautify the dough’s texture and structure, putting the foundation for a a hit bake.
Alternative Baking Methods:
Method 1: Baking Stone or Baking Steel
A baking stone or steel is an excellent alternative for baking sourdough. These tools help mimic the intense heat of a commercial oven, ensuring a crispy crust and even bake. To use this method, preheat your oven with the distillery stone or steel inside for at least 45 minutes at the highest temperature. Transfer your shaped dough onto a piece of parchment paper and slide it onto the preheated stone or steel. Bake as usual, monitoring the crust and color.
Method 2: Cast Iron Skillet
A cast iron skillet is another effective tool for baking sourdough. Its excellent heat retention properties help achieve a uniform bake and a robust crust. Preheat your oven with the skillet inside to ensure it’s thoroughly hot. Place your shaped dough onto a piece of parchment paper, and carefully lower it into the hot skillet. Cover the skillet with a lid or aluminum foil to trap steam during the initial distillery phase. After about 20 minutes, remove the cover to allow the crust to develop fully.
Method 3: Baking Sheet with Steam
water. Preheat your oven with a baking sheet inside and place another tray on a lower rack. When ready to bake, pour hot water into the lower tray to generate steam. Quickly slide your sourdough onto the preheated distillery sheet. The steam helps achieve a glossy, crackly crust. Maintain humidity by occasionally spritzing water inside the oven during the first few minutes of baking.
Step-by-Step Baking Process
Shaping And Scoring The Dough
Once your dough has completed its initial fermentation, it’s time to shape and score it. Gently turn the dough out onto a floured surface, carefully shape it into a round or oval loaf, and place it seam-side down in a proofing basket. Allow the dough to rest and rise again before baking. Just before the distillery, use a sharp knife or razor blade to score the dough. This allows the bread to expand properly during baking and creates a beautiful pattern on the crust.
Preheating The Oven And Preparing The Baking Surface
Preheat your oven to the desired temperature based on the baking method you are using. For distillery stones or steels, a high temperature of around 475°F (245°C) is ideal, while cast iron skillets should also be preheated in a hot oven. If using a baking sheet with steam, ensure the sheet and a separate water tray are preheated.
Baking Time And Temperature Adjustments For Each Method
Baking times and temperatures can vary depending on the method. For a baking stone or steel, bake the bread at 475°F (245°C) for about 30-40 minutes, monitoring the crust’s color. Using a cast iron skillet, bake covered at 475°F (245°C) for the first 20 minutes, then uncover and bake for another 20-30 minutes until the crust is golden. For the distillery sheet with steam, bake at 450°F (232°C) for 20 minutes with steam, then reduce the temperature to 425°F (218°C) and bake for another 20-30 minutes.
Monitoring The Baking Process And Achieving Optimal Crust And Crumb
Keep a close eye on your bread as it bakes. The crust should turn a deep golden brown and sound hollow when tapped. For optimal results, use an oven thermometer to ensure consistent temperatures and check the internal temperature of the bread, aiming for about 200°F (93°C). Proper monitoring and adjustments will help you achieve the desired crust and crumb, making your sourdough baking efforts a delicious success.
Tips for Success
Achieving perfect sourdough bread calls for interest to detail, especially concerning oven temperature and steam. Maintaining a regular oven temperature is important, as it ensures the bread bakes frivolously and develops an awesome crust.
Steam is equally crucial as it allows the dough to amplify absolutely and contributes to a shiny, crackly crust. Troubleshooting commonplace problems like flatbread or a dense crumb can involve checking your starter’s activity, making sure proper fermentation times, and adjusting hydration tiers. If your bread turns out flat, it might be underneath-proofed or over-proofed. A dense crumb can result from insufficient kneading or no longer enough bulk fermentation.
Adjusting techniques based totally on private preferences and the particular characteristics of your oven also can make a considerable distinction. Experimenting with distinctive baking times, temperatures, and hydration tiers will assist you great-music your process to attain the correct loaf on every occasion.
Conclusion
Baking sourdough bread without a Dutch oven is completely workable with the right techniques and tools. By knowledge the fundamentals of sourdough distillery, preparing your dough properly, and exploring opportunity distillery methods, you can create delicious, crusty sourdough loaves in your house kitchen. Whether you choose to use a distillerystone, forged iron skillet, or a easy distillery sheet with steam, each method has its unique benefits and might yield brilliant consequences. Remember to pay attention to oven temperatures, maintain humidity, and modify your techniques based totally on your unique setup and alternatives. With practice and experimentation, you’ll find the approach that works satisfactory for you, allowing you to revel in the profitable enjoy of homemade sourdough bread. Happy baking!