A pot roast is the epitome of comfort food, beloved for its hearty, warming nature that can turn even the simplest of meals into a sumptuous feast. It’s a dish rooted in tradition, evoking memories of family dinners, slow Sundays, and the deep satisfaction that comes from a meal well-cooked. The Dutch oven, with its robust construction and ability to retain heat evenly, elevates the humble pot roast to a level of culinary perfection that few other methods can match. This guide will explore how to make a pot roast in a Dutch oven, offering step-by-step insights to ensure that your roast is as tender and flavorful as possible.
1. What is a Pot Roast?
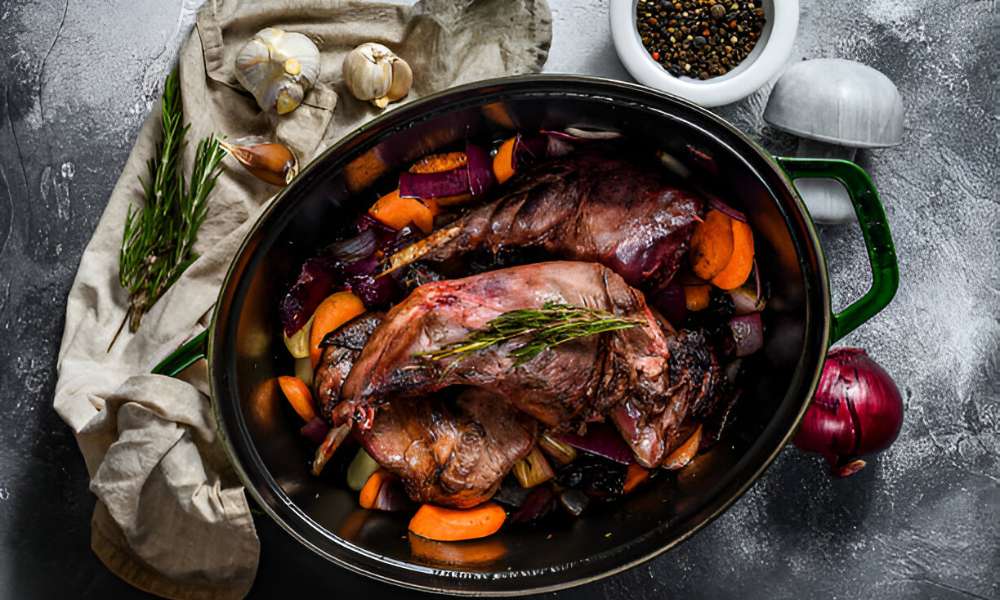
At its core, a pot roast is a large cut of beef, slow-cooked in a covered pot, surrounded by vegetables and a rich, savory broth. Originating from methods of braising tough cuts of meat, this dish has become a symbol of homestyle cooking. While the concept dates back centuries, with roots in European and American culinary traditions, modern interpretations often introduce diverse flavor profiles. Yet, the essentials remain: slow cooking, moisture retention, and hearty ingredients that meld together to create a mouthwatering meal.
2. Why Use a Dutch Oven for Pot Roast?
The Dutch oven is unequalled in terms of cooking pot roast. Its heavy, cast-iron body ensures even heat distribution, decreasing the danger of warm spots and choppy cooking. Unlike a sluggish cooker or strain cooker, a Dutch oven permits you to sear, braise, and simmer multi functional vessel. It excels at moisture retention, way to its tight-becoming lid, which locks in steam and taste at some stage in the lengthy cooking technique. The versatility of this cookware way it can pass seamlessly from stovetop to oven, adapting to the slow-cooking wishes of a perfect utensil roast.
3. Choosing the Right Cut of Meat
For a succulent pot roast, selecting the right cut of beef is crucial. Traditional cuts like chuck roast, brisket, and round roast are ideal, as their rich marbling ensures that they break down into tender, juicy morsels when cooked low and slow. Marbling, or the streaks of fat within the muscle, is key to achieving that melt-in-your-mouth texture. Look for cuts with an even distribution of fat to keep the meat moist. Always choose high-quality meat—grass-fed or locally sourced if possible—for the best flavor and texture.
4. Essential Ingredients for the Perfect Pot Roast
Beyond the meat, the ingredients you choose will greatly impact the flavor and complexity of your pot roast. Here’s a breakdown of what you’ll need:
Meat: Opt for chuck roast, brisket, or round roast based on availability.
Vegetables: Classic choices include carrots, potatoes, onions, and celery, which absorb the broth and release their natural sweetness during cooking.
Herbs and Spices: Aromatics like garlic, thyme, rosemary, and bay leaves infuse the dish with deep, earthy flavors.
Stock or Broth: Beef stock is preferred, though chicken or vegetable broth can be used in a pinch. Red wine or Worcestershire sauce adds an additional layer of depth.
Flavor Enhancers: Tomato paste, Worcestershire sauce, and red wine can amplify the umami notes and enrich the sauce.
5. Step-by-Step Instructions for Preparing the Pot Roast
1. Preparing the Meat
Season the roast liberally with salt, pepper, and any additional spices. Heat your Dutch oven over medium-high heat, adding a splash of oil. Sear the roast on all sides until a dark, caramelized crust forms—this step locks in flavor and adds complexity to the final dish.
2. Adding Aromatics and Vegetables
Once the meat is seared, remove it from the pot and set it aside. Add chopped onions, garlic, and other vegetables to the Dutch oven, sautéing until softened and fragrant. This creates a flavorful base for your pot roast.
3. Deglazing the Dutch Oven
Deglaze the pot with stock, broth, or wine, scraping up any browned bits stuck to the bottom. This “fond” is rich in flavor and will become part of the braising liquid. For an added layer of depth, mix red wine with your stock.
4. Braising the Pot Roast
Return the roast to the Dutch oven, nestling it among the vegetables and aromatics. Add enough liquid to cover about two-thirds of the roast. Cover the pot and transfer it to a preheated oven, cooking low and slow at around 300°F for 3-4 hours. Turn the roast halfway through to ensure even cooking.
6. How to Check for Doneness and Tenderness
A perfectly cooked pot roast should be fork-tender, meaning a fork can easily pierce the meat and pull it apart. Check the internal temperature with a meat thermometer; it should be between 190°F and 205°F. Visually, the roast should have a deep, rich color and a slightly gelatinous texture from the breakdown of collagen in the meat. Avoid overcooking, which can dry out the roast, or undercooking, which leaves the meat tough.
7. Resting and Slicing
After removing the pot roast from the oven, let it rest for at least 15 minutes. Resting allows the juices to redistribute, ensuring a moist and flavorful bite. When ready to slice, always cut against the grain—this shortens the muscle fibers and makes each bite more tender.
8. Making the Perfect Pot Roast Gravy
To make the gravy, remove the roast and vegetables from the Dutch oven, leaving the juices behind. Heat the pot over medium heat and whisk in a thickening agent such as flour or cornstarch. Stir continuously until the gravy reaches your desired consistency. For added flavor, enhance the gravy with a splash of wine, extra herbs, or even a knob of butter.
9. Serving Suggestions
Serve the pot roast surrounded by its vegetables, with a generous ladle of gravy over the top. Pair it with creamy mashed potatoes, roasted root vegetables, or crusty bread for a complete meal. A sprinkle of fresh herbs, such as parsley or thyme, adds a pop of color and freshness to the dish, making it both visually appealing and aromatic.
10. Pot Roast Variations and Tips for Customization
Pot roast can be customized to suit any flavor profile or dietary preference. For an Italian-inspired roast, add tomatoes, basil, and oregano to the braising liquid. A French variation might include mushrooms, shallots, and a touch of Dijon mustard. If you’re looking for a lower-carb option, omit the potatoes and serve with mashed cauliflower or roasted greens.
11. Expert Tips for the Best Pot Roast Every Time
Patience is the key to a tender pot roast. Slow cooking allows the connective tissues to break down, transforming the meat into something truly delectable. Adjust cooking times depending on the size of your roast—larger cuts may require additional hours. If your roast isn’t as tender as expected, return it to the oven and cook for another 30 minutes. Common issues like dry meat or lack of flavor can be avoided by ensuring adequate liquid levels and frequent taste checks.
12. How to Store and Reheat Pot Roast
Leftover pot roast can be stored in an airtight container in the refrigerator for up to 4 days. When reheating, do so gently, either in the oven or on the stovetop, with a little added liquid to maintain moisture. Utensil roast also freezes well—simply portion it into freezer-safe bags or containers and thaw in the refrigerator overnight before reheating.
Conclusion
A Dutch oven is your greatest ally in creating a utensil roast that’s tender, flavorful, and steeped in tradition. With its unique ability to lock in moisture and develop complex flavors, it transforms a simple meal into an unforgettable culinary experience. Take your time, choose the right ingredients, and enjoy the process—because the reward is always worth the wait.